
Allistar Center · Geometry Atlas · Study
Space-Time Cones
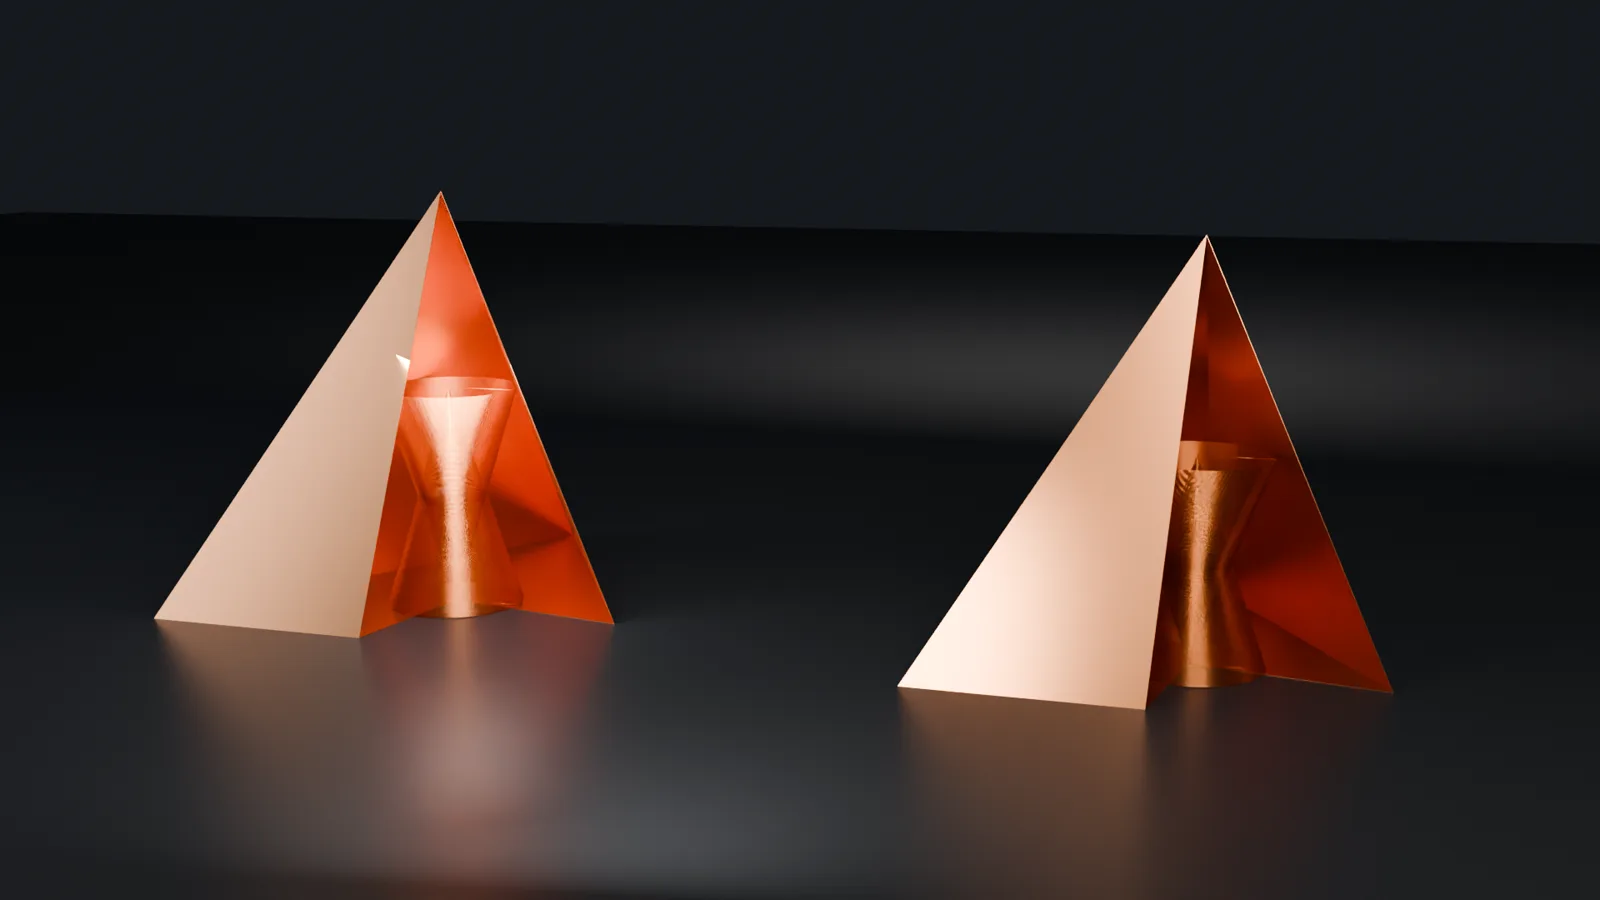
Two interpenetrating copper coils, sealed inside a copper tetrahedron that fits them exactly. One version is proportioned by the golden ratio, the other by the square root of two.
The idea
The starting point is a design principle: the double-cone coil must sit inside a perfectly fitting three-sided pyramid, a regular tetrahedron. If that is true, there should be a mathematical relationship between the cones, the tetrahedron, and the crystal at the centre. This page records the model, and everything the geometry shows when it is worked out exactly.
Each version has two cones on the same axis, one pointing up and one pointing down. The apex of each cone sits at the centre of the other cone's base. A single enamelled copper wire winds up the first cone, crosses to the second, winds down it, and returns to the start, so it forms a closed circuit.
Watch the video
Video coming soon
Chapters
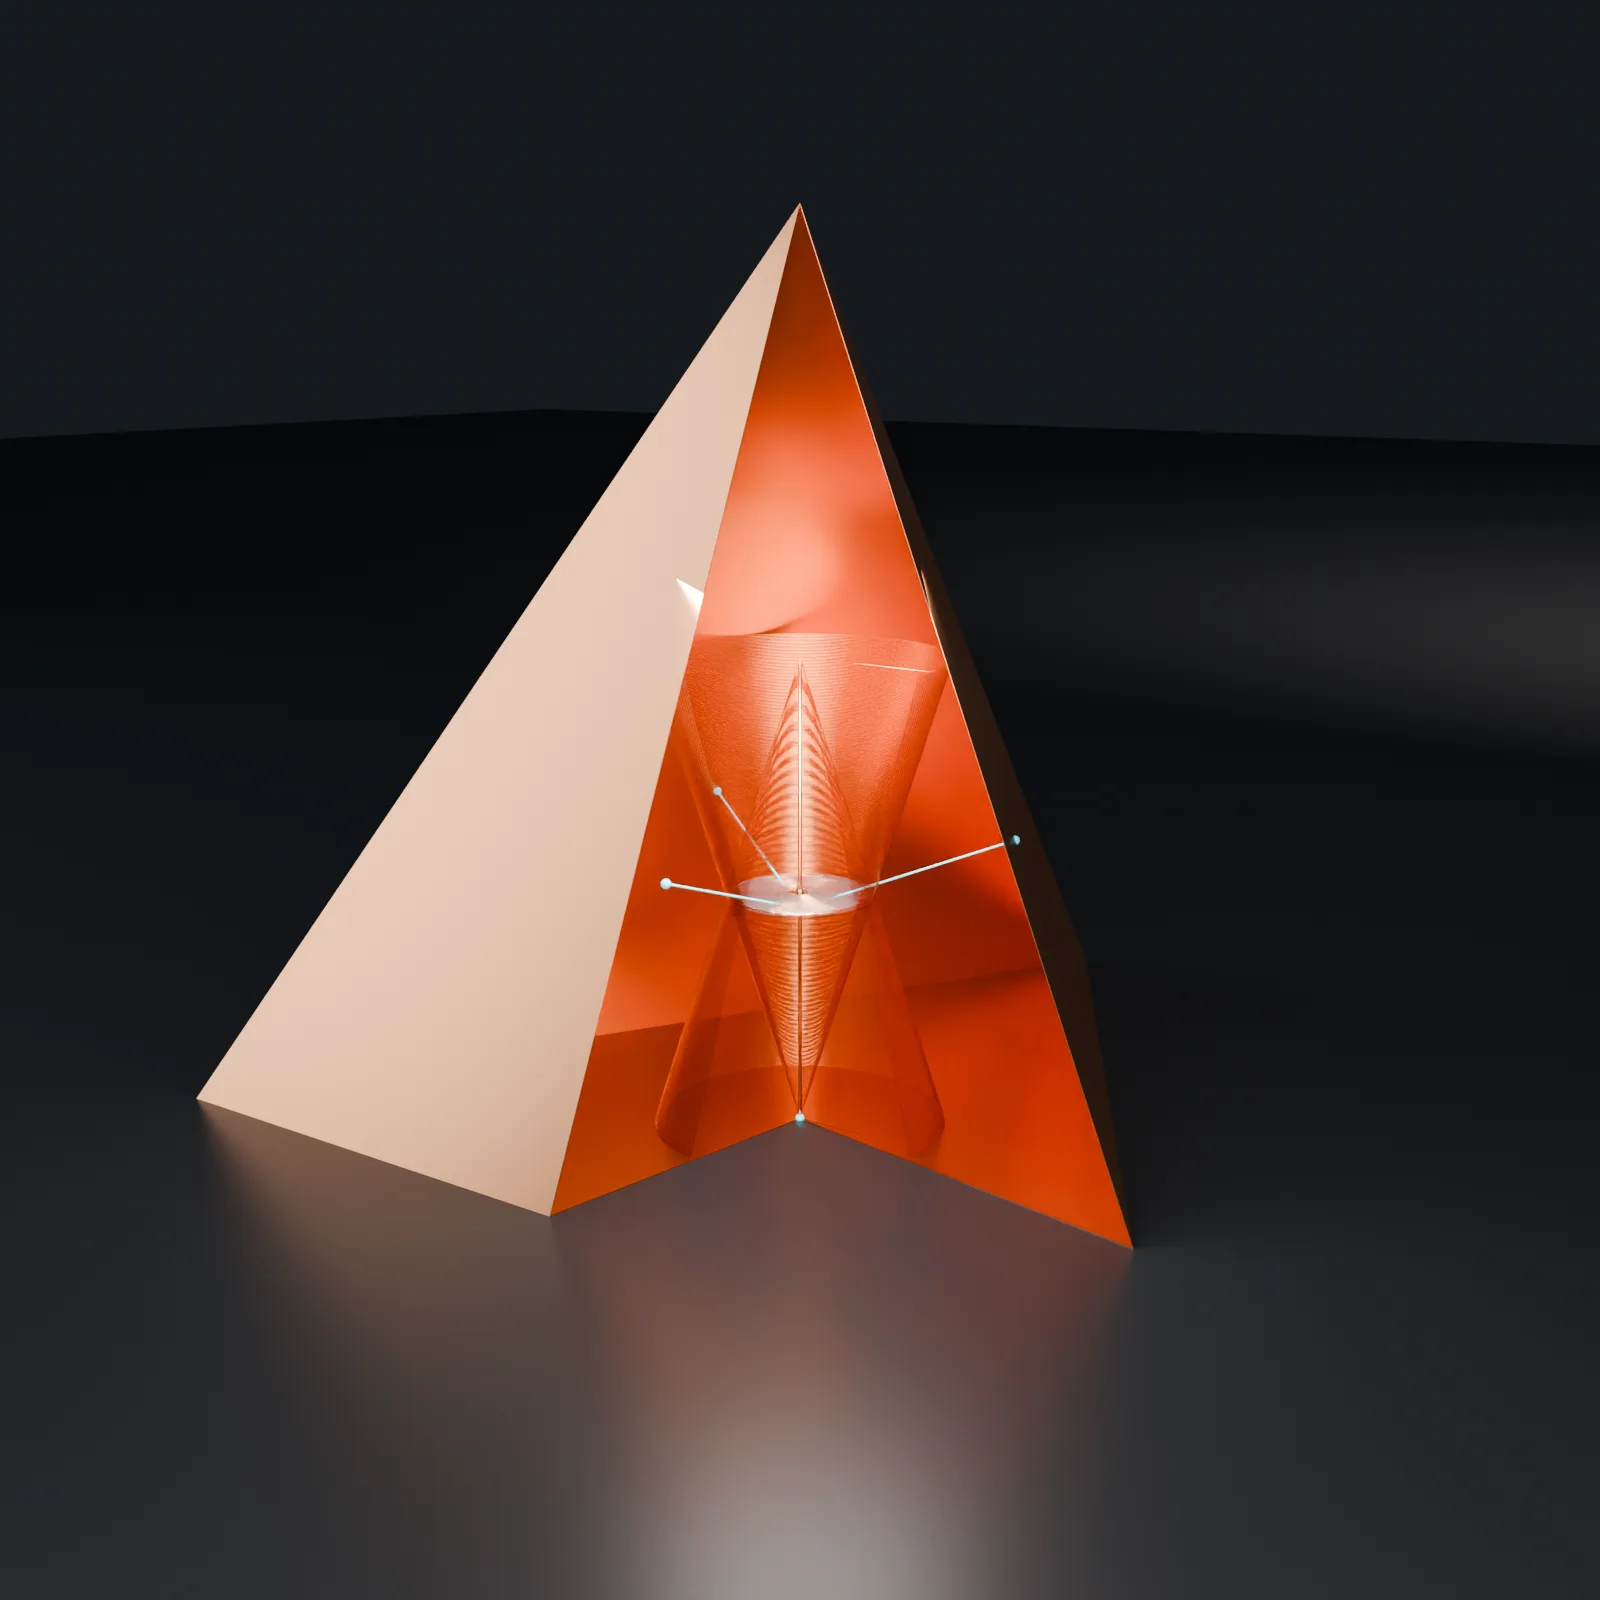
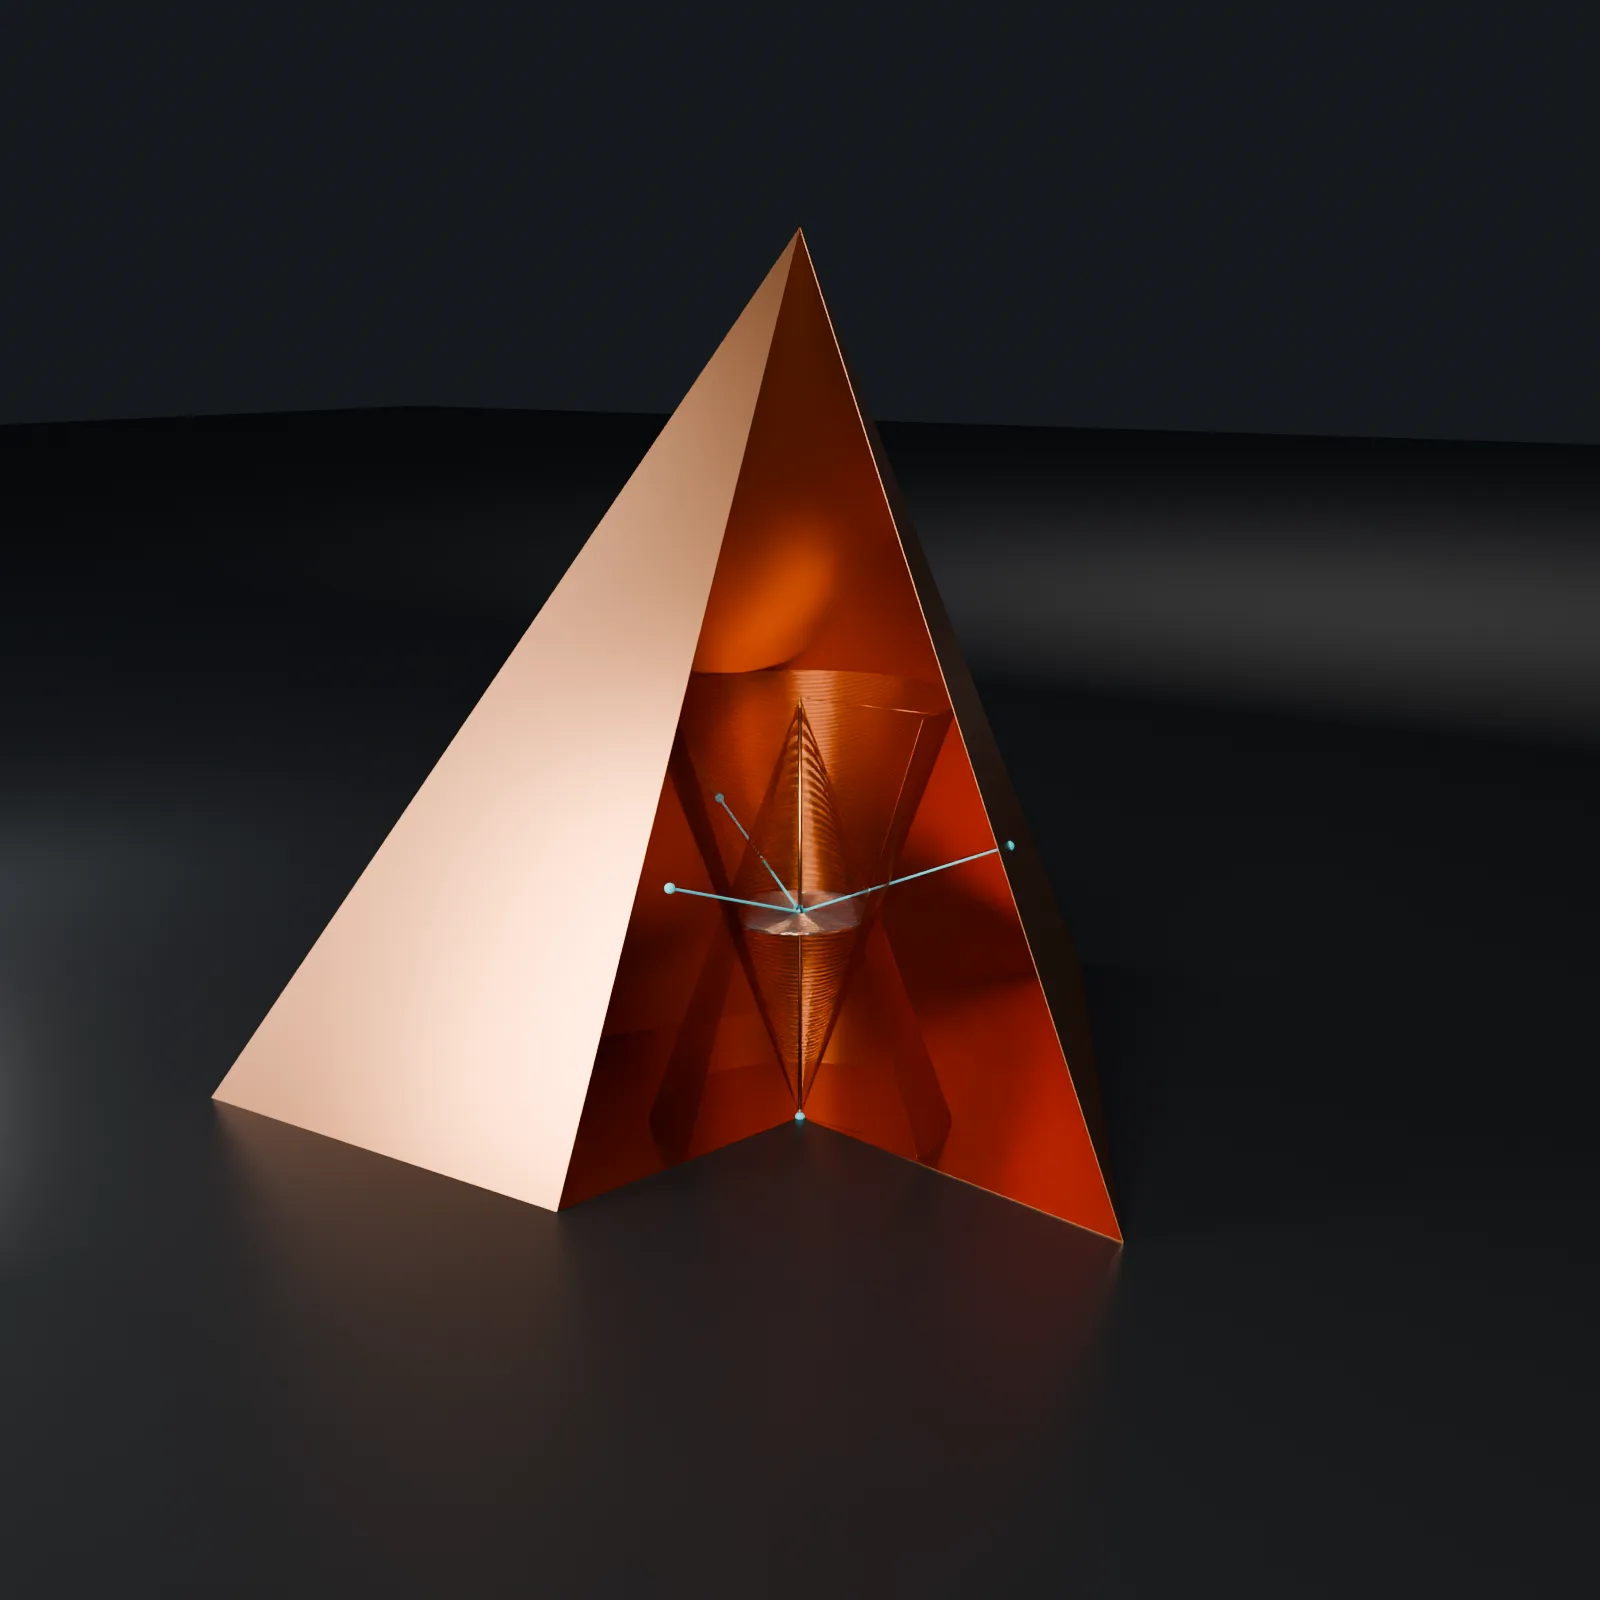
V1 and V2 side by side
Specifications
| V1 · φ | V2 · √2 | |
|---|---|---|
| Cone base diameter D | 37 cm | 37 cm |
| Cone height H | φ·D = 59.87 cm | √2·D = 52.33 cm |
| Cone apex angle | 34.34° | 38.94° |
| Turns per cone · wire | 333 · 0.8 mm enamelled Cu | 333 · 0.8 mm enamelled Cu |
| Turn spacing along the cone surface | 1.88 mm (1.08 mm gap) | 1.67 mm (0.87 mm gap) |
| Total wire · DC resistance | ≈ 388 m · ≈ 13.3 Ω | ≈ 388 m · ≈ 13.3 Ω |
| Tetrahedron edge (inside) | 137.8 cm | 128.5 cm |
| Tetrahedron height (inside) | 112.5 cm | 105.0 cm |
| Tetrahedron wall | 1 mm copper sheet | 1 mm copper sheet |
| Crystal height above the floor (where the two coils cross) | 29.93 cm | 26.16 cm |
| Tetrahedron centre above the floor | 28.05 cm | 26.16 cm |
| Gap between the two centres | 1.89 cm (crystal higher) | 0 (they coincide) |
Tetrahedron sizes include the wire thickness; heights and the gap are exact values for the ideal geometry. "Fits exactly" means the lower base ring rests on the floor and the upper base ring touches all three sloping walls at once.
What the geometry shows
Worked out exactly, every dimension of the tetrahedron is the base diameter D multiplied by just two numbers: √2, which belongs to the tetrahedron, and the cone's own height ratio.
Explore it in 3D
Drag to rotate, scroll or pinch to zoom. Switch between the 78°, √2 and golden cones to watch the crystal move around the true centre, and meet it only with √2.
The 3D view needs WebGL, which this browser has turned off. The diagrams below show the same geometry.
Turn on Cutting plane and press Side cut: the flat diagrams below are this slice. It passes through one corner and the middle of the opposite face, which is why the cut looks lopsided even though the tetrahedron is perfectly regular. The coil is drawn with fewer turns so it stays readable.
Both panels are drawn to the same scale. Each is a cut through the axis, one base corner (left) and the middle of the opposite base edge (right).
Exact relationships
| Quantity | V1 · φ | V2 · √2 |
|---|---|---|
| Cone height | φ·D | √2·D |
| Tetrahedron height | (√2 + φ)·D | 2√2·D = √8·D |
| Tetrahedron edge | (√3 + φ·√6/2)·D | 2√3·D = √12·D |
| Tetrahedron centre, above the floor (= distance from the centre to each face) | (√2 + φ)·D/4 | √2·D/2 |
| Crystal (coil centre), above the floor | φ·D/2 | √2·D/2 |
| Crystal minus tetrahedron centre | (φ − √2)·D/4 ≈ 1.89 cm | 0 |
| Cone side angle from the axis | tan = 1/(2φ) · 17.17° | tan = 1/(2√2) · 19.47° |
| Tetrahedron face angle from the axis | arcsin(1/3) · 19.47° | arcsin(1/3) · 19.47° |
| Angle between face perpendiculars | arccos(−1/3) · 109.47° | 109.47° |
The empty space: cone bases to the tetrahedron
How far each cone base ring sits from the tetrahedron's edges, corners and walls. In each formula, H is the cone height and D the base diameter.
| Gap | Exact | V1 · φ | V2 · √2 |
|---|---|---|---|
| Bottom ring → base edge (along the floor) | H / (2√2) | 21.17 cm | 18.50 cm = D/2 |
| Bottom ring → sloping wall (perpendicular) | H / 3 | 19.96 cm | 17.44 cm |
| Bottom ring → base corner | D/2 + H/√2 | 60.83 cm | 55.50 cm = 3D/2 |
| Top ring → sloping walls | 0 (by design) | 0 cm · touching | 0 cm · touching |
| Top ring → vertical edge (same height) | D / 2 | 18.50 cm | 18.50 cm |
| Top ring → vertical edge (perpendicular) | D / √6 | 15.11 cm | 15.11 cm |
| Top ring → apex | √2·D | 52.33 cm | 52.33 cm |
These are exact values for the ideal geometry. In the 3D model, which includes the 0.8 mm wire, the measured gaps match to within 0.3 cm.
The tetrahedron is the two ratios added together. Its height is (√2 + φ)·D. The coil fills the lower φ·D, and the space above it is always exactly √2·D, whatever the cone shape. That top section is a smaller tetrahedron, and the cone it would hold is exactly the V2 cone.
With φ cones, the crystal misses the centre. In V1 the tetrahedron's true centre, where the four face perpendiculars meet, sits (φ − √2)·D/4 ≈ 1.89 cm below the crystal. That is just under the 20 mm crystal, inside the lower rod. The whole offset comes from the difference between φ (1.618) and √2 (1.414).
The bottom gap is always one third of the cone height. The perpendicular distance from the bottom ring to the sloping walls is exactly H/3 in any design that fits this way. The gaps around the top ring are fixed by the tetrahedron alone: D/2 sideways to each edge, D/√6 straight to each edge, and √2·D to the apex. They are the same in both versions.
Two different centres matter here, and they are easy to mix up:
- The crystal sits where the two cones cross, exactly halfway up the coil: H/2. That is 29.93 cm above the floor in V1 and 26.16 cm in V2. The cones are 18.5 cm across there in both versions.
- The tetrahedron's true centre is where the four face-to-centre lines meet: a quarter of its height, h/4. That is 28.05 cm in V1 and 26.16 cm in V2.
In V1 the two centres are 1.89 cm apart, with the crystal higher. In V2 they are the same point.
Only √2 cones put the crystal at the centre. For the coil's centre to coincide with the tetrahedron's centre, the cone height must be exactly √2·D, giving an apex angle of 38.94°. Then every measurement becomes a whole number times a square root of D:
- Size: the edge is √12·D and the height is √8·D, exactly twice the coil height.
- Mirror: the empty space above the coil is a mirror copy of the coil's own size.
- Bottom gaps: the bottom ring is D/2 from each base edge (the same as at the top) and 3D/2 from each base corner.
- Slopes: the cone sides slope at exactly the walls' angle, 19.47°, the angle whose sine is 1/3.
The √2 version repeats itself. The empty space above a √2 coil is a smaller tetrahedron with exactly the same proportions. A √2 coil that fits it is exactly half the size (18.5 cm across), and its lower tip touches the upper tip of the coil below. Repeat it, and each coil is half the one beneath, climbing toward the apex. Their heights add up as H + H/2 + H/4 + … = 2H, which is exactly the tetrahedron's height, so the tower of coils reaches the apex. With φ cones the space above holds a coil about 0.47 times the size, and the pattern does not repeat cleanly.
A regular tetrahedron's own proportions are built from √2, √3, √6 and the angle arcsin(1/3). A shape that fits it in every respect therefore tends to take on those roots. The golden ratio does not come from tetrahedral geometry, so φ cones fit tightly but always leave a small mismatch. Which version is right for the device is an open question that only testing can answer.
The cone family: 78°, 19.5° and φ
Bashar refers to cones of 19.5° and 78°, and describes the 19.5° cone through 33⅓. Worked out exactly, three cones belong together. They differ only in one number: the cone's height divided by its base diameter.
| Cone | 78° · 1/φ | √2 · 19.5° | Golden φ |
|---|---|---|---|
| Height ÷ base diameter | 1/φ = 0.618 | √2 = 1.414 | φ = 1.618 |
| Side angle from the axis | 38.97° | 19.47° (sin = 1/3) | 17.17° |
| Full tip angle | 77.95° | 38.94° | 34.34° |
| Unrolled: slice of a full circle | 62.9% (226.4°) | 33⅓% exactly (120°) | 29.5% (106.3°) |
| Base radius ÷ slanted side | 0.629 | 1/3 exactly | 0.295 |
| Fitting tetrahedron height (D = 37 cm) | 75.2 cm | 104.7 cm | 112.2 cm |
| Crystal vs the tetrahedron's true centre | 7.36 cm below | 0, exactly centred | 1.89 cm above |
| Offset formula | offset = (height ÷ diameter − √2) · D / 4 | ||
Explore: roll a slice of a circle into a cone
Cut a slice out of a circle and roll it up: the circle's radius becomes the cone's slanted side, and the slice's curved edge becomes its base. The bigger the slice, the wider the cone.
How the three cones relate
Roll exactly one third of a circle and you get the √2 cone. Its base radius is exactly one third of its slanted side, so its sides lean at the angle whose sine is 1/3: 19.47°, the 19.5° tetrahedral angle. In practice you can make it without measuring any angle: cut a disc into three equal slices and roll one.
Half of the 78° cone's tip angle (77.95° ÷ 2 = 38.97°) is almost exactly the √2 cone's tip angle (38.94°, a 0.03° difference). Half of the √2 cone's tip angle is exactly 19.47°. The √2 cone is the middle step of the sequence.
The golden cone is φ times as tall as it is wide; the 78° cone is the same proportion turned on its side, φ times as wide as it is tall. The two ratios differ by exactly one: φ − 1/φ = 1.
In a fitting tetrahedron, the crystal sits below the true centre with the 78° cone (7.36 cm) and above it with the golden cone (1.89 cm). The √2 cone, between the two, is the only one that lands exactly on it. All three follow the same rule: offset = (height ÷ diameter − √2) · D/4.
Switch the 3D model above to 78° · 1/φ to see the flat cone in its own tetrahedron. Geometry here is exact; what these cones do physically is for experiment to show.
The core
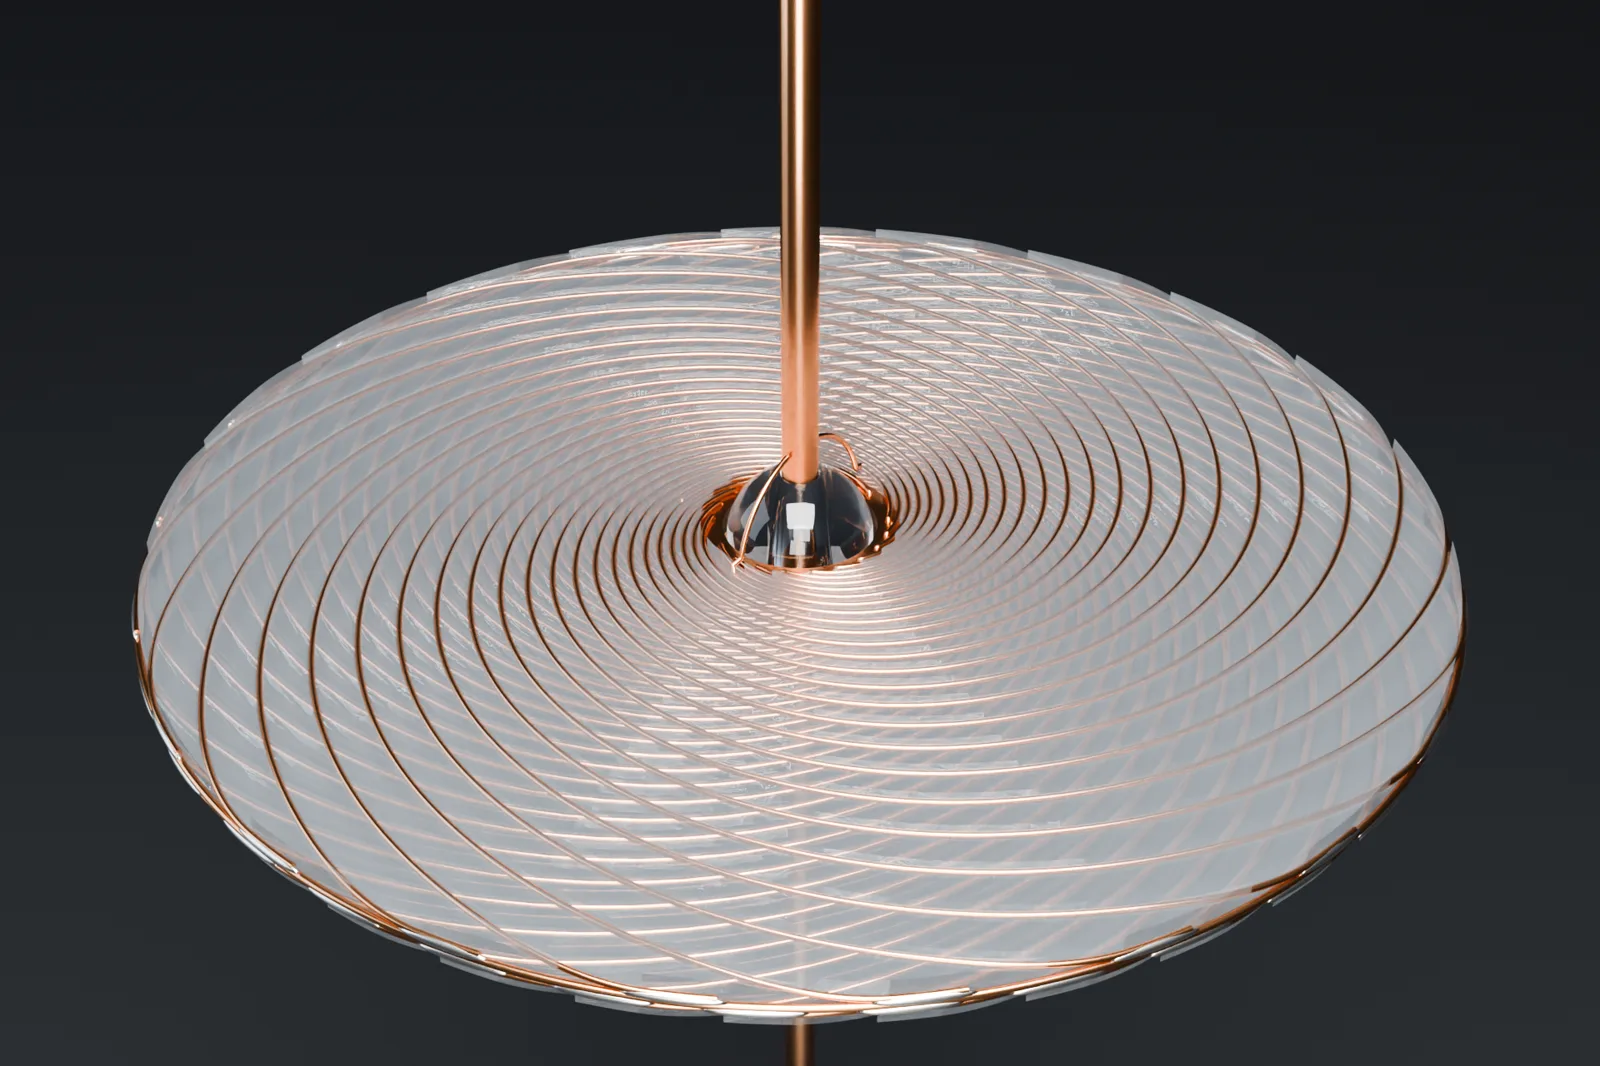
- Rod: a single 5 mm copper rod on the central axis, stopping 1 cm short of each cone's apex. It passes through a hole drilled in the crystal.
- Crystal: a 20 mm quartz sphere at the centre of the coil.
- Inner ring: flat, solid copper, 21 mm inside and 27 mm outside diameter, 3 mm thick, with a 0.5 mm gap to the crystal. Each spiral goes into its own 1 mm hole, 1.5 mm deep.
- Disc: 6 mm polycarbonate, 17.4 cm across. The copper spirals are inlaid in channels 1 mm wide and 1.5 mm deep.
- Spirals: 21 golden spirals on top turning anticlockwise and 34 underneath turning clockwise, all 0.8 mm copper. Each spiral widens by φ every quarter turn.
- Rod connections: four spirals are insulated from the inner ring and run over the crystal to the rod instead: two from the top set at 90° and 270°, and two from the bottom set at 0° and 180°, so the two pairs are exactly perpendicular. Because 21 is odd, the two top spirals leave their channels at slightly different radii (14.5 mm and 15.18 mm) so they meet the rod exactly opposite each other.
- Outer ring: a 1 mm copper wire around the edge of the disc. All 55 spirals curve smoothly onto it with no sharp bends (the tightest bend radius is 12.7 mm) and are soldered along it.
Golden in two directions
In V1 the golden ratio runs through the device twice. Along the axis, each cone is φ times as tall as it is wide. Across the disc, every spiral widens by φ each quarter turn, and the two sets, 21 and 34, are neighbouring Fibonacci numbers whose ratio (1.619…) approaches φ. In V2 only the axis changes to √2; the disc stays golden.
Three motions: the design idea
Each shape turns rotation into another kind of motion. This is plain geometry:
- Spiral → radial: like the self-centring chuck on a lathe, turning a spiral moves its jaws straight in or out. Rotating one spiral set against the other makes the crossing points travel toward the centre, or away from it when the rotation reverses.
- Helix → axial: like a screw, turning a helix advances it along its axis. Each cone's winding is a helix that narrows to a point.
Both shapes also concentrate the field. A smaller loop concentrates its field more tightly, so each cone's field is strongest toward its tip. On the disc, the spirals crowd together and cross more and more often toward the centre. The working idea, not yet measured, is that these gradients drive flow: axially through the cones (up one, down the other) and radially across the disc. Together they would form a spherical pulse of expansion and contraction around the centre, following the rhythm of the alternating current that drives it.
Both versions
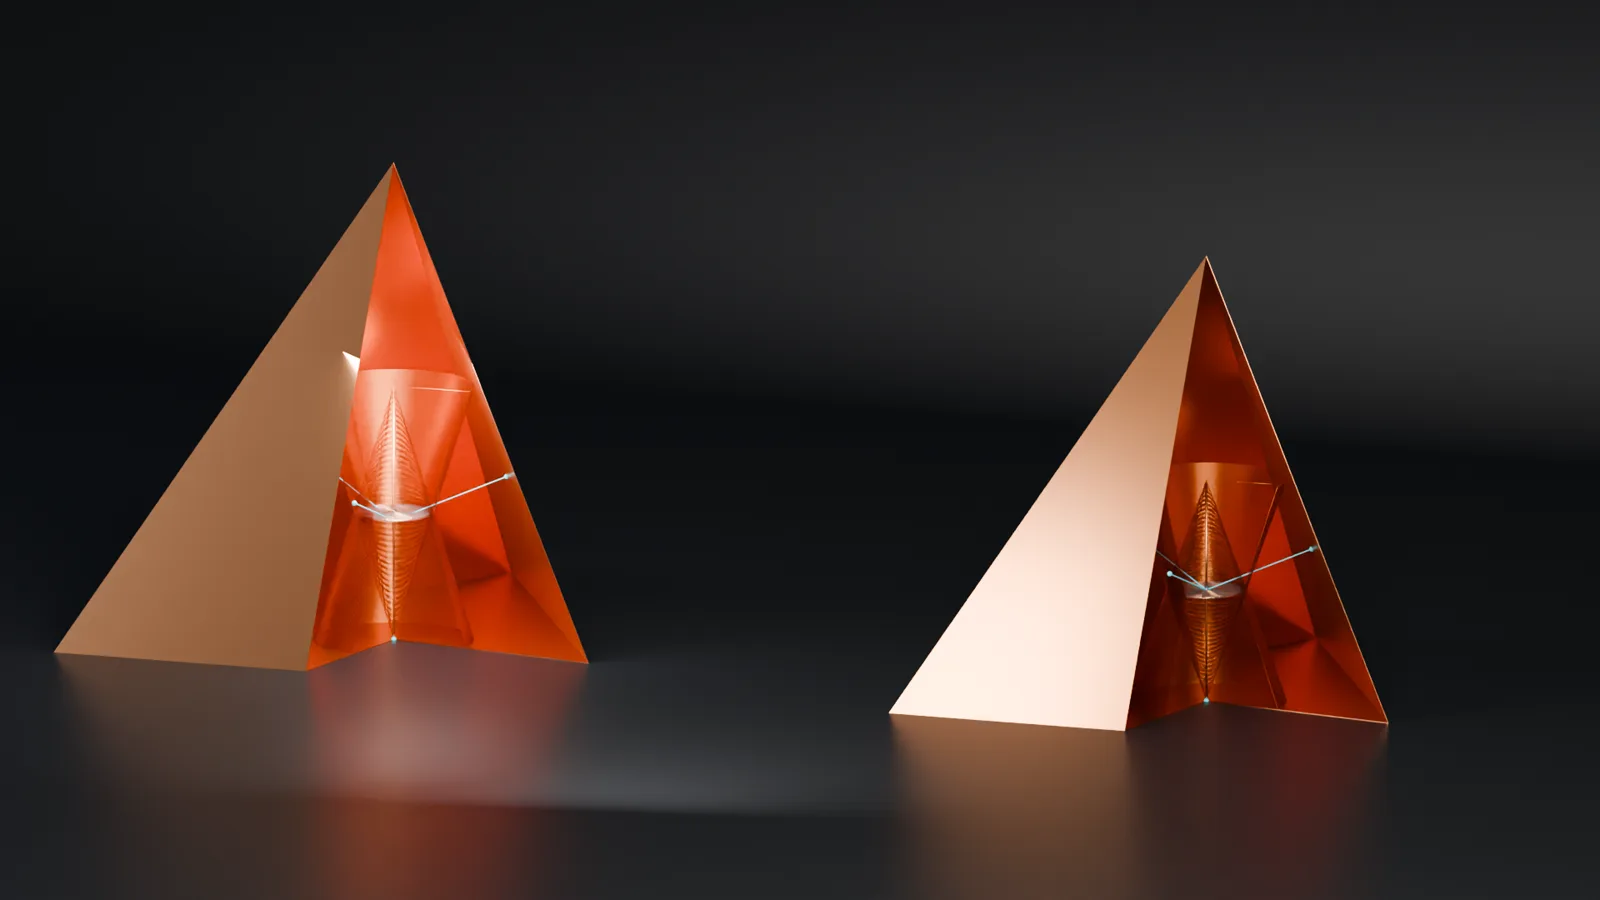
Notes for builders
- The two coils cross at mid-height. Each cone narrows evenly from its base to its tip, so halfway up it is exactly half its base width: 18.5 cm across in both versions. Only the height of that crossing differs: 29.93 cm above the floor in V1, 26.16 cm in V2, and the crystal sits there. Because the windings meet at that ring, solid cone formers won't work; you'll need an open frame such as rods or spokes. Only the enamel separates the two windings where they cross.
- Closest gap, rod to coil: 1 cm from the cone apex the gap is only about 0.2 mm in V1 and 0.65 mm in V2.
- The closed 1 mm copper tetrahedron shields the coil. It also picks up currents induced by the coil. An open base, or a slit along one edge, would stop current flowing all the way round the shell.
- Tight spot on the disc: within about 15 mm of the centre, the 34 bottom spirals run so close together that neighbouring wires touch. That does no harm, because they all join the inner ring anyway. The insulated rod spirals keep at least 0.27 mm of clearance from their neighbours.
- Model file: space-time-cones.blend (Blender 5.0, 5.5 MB) contains both versions.